Facebook Pinterest Instagram Bloglovin' Teachers Pay Teachers Image Map
Showing posts with label Technology in the Classroom. Show all posts

Amazon Prime Teacher Shopping Finds


I know that you may have heard so much about Amazon Prime, but it really is AMAZING. And yes, there are great deals on books, but there are so many other great teacher tools as well. 

First grade technology

Technology is definitely a big part of our lives and our students' lives. I'm not at a 1:1 school site, so I'm constantly trying to make use of the 5 iPads that belong to my class. I found this headphone splitter a few months ago. IT'S THE BEST! I'm able to allow up to 5 students to listen to a read aloud, while other students are able to use the remaining iPads. Click {HERE} to check it out. 

Amazon Classroom
Belkin Rockstar Multi Headphone Splitter 

First grade classroom

Amazon has helped me with classroom organization, which is crucial for a teacher's sanity. We have so many pens, pencils, clips, and notepads to keep track of. I found this cube to organize my pens. Click {HERE} to check it out. I also used a sunglass organizer for supplies. Although I feel like the price keeps going up on it. Want to see it? Click {HERE}.

classroom staples

The main reason I LOVE AmazonPrime is because I can get my classroom staples speedy fast. Out of your favorite markers? No problem. There's a even chance you may be able to get your items the same day. Including the most important teacher find... COFFEE. I buy mine in bulk. 60 K-cups. Yes, please! #coffeeaddict

Have you found some awesome teacher goodies on Amazon?! Please share them below or find me on Instagram! I'd love to check them out. 

Happy shopping!


SaveSave

Top Ways Technology has CHANGED Teaching!


2004 till now! Wow! How my life has changed as an educator... A little time travel my mind has gone on. I've changed from...

  • Kindergarten Teacher
  • 5th/4th ELA Split Teacher
  • 2nd Grade Teacher [Inclusion and Co-Teach]
  • 3rd Grade Teacher
  • Title I Reading
  • Reading Specialist
  • Literacy Coach
  • Currently: 5th Grade ELA Teacher / Co-Teach

So you can imagine the changes just in positions, states, counties and schools! Everyone has their own way of doing things and their own version. I feel those changes are harder for me because I always have the "I'm new" feeling.

But, in my career as an educator there have been some HUGE changes in instructional resources and tools. But, there have been some things that have never changed like what good instruction really is. I've only improved my instruction over the years with the help of time, resources, tools, approaches, professional development, great mentors and more!

It's pretty simple in my mind, education is just like the rest of the world. It's going to continuously change, but great educators will always give great instruction!

A few examples of what instruction HAS NOT CHANGED in my current life:

  • Readers Workshop [mini lesson, work period, closing]
  • Guided Reading [skill and strategy groups too]
  • Conferencing with students
  • Variety of lessons to reach all learners on the same standard
  • Language Instruction
  • Morning Meeting
  • Character Lessons
The list can go on. What I mean is, I started out doing these things and I still do them today. I've only improved my craft [or trade] over the years based on everything a variety of experiences. But, what else has made me better was the HUGE change in our world that affected education. Technology! 


Think about it, yes we have technology in our schools now that is more sophisticated for students to do research with, learn from and learn with. But technology has improved how we prepare for instruction and how we deliver instruction. I mean I had the printer with the paper that had perforated lines and computer with floppy disks. We didn't use technology to help us prepare our lessons, we did it all by hand. 

Here's how technology has helped me with instruction:
  • Teachers Pay Teachers
  • Google Docs and Drive
  • Planbook
  • Powerpoint
  • Apps
  • Blogs and Websites
  • YouTube and Teacher Channel
  • Video Capabilities
  • Photographs with phones, tablets, computers
Technology has also changed in the room that helps me deliver my more sophisticated instruction:
  • Overhead Projector vs. Document Camera
  • Chalkboard vs. Smartboard
  • Old Desktop Computer vs. Laptops & Tablets
  • Plug In Listening Station vs. Laptops & Tablets
The list can go on and on. I am so grateful for these items in my current classroom that help me deliver instruction and provide a 21st Century Learning environment. But, I am more grateful in the advances of technology that has helped me prepare better lessons for instruction and has helped me learn more about doing my craft better!

Technology has improved in becoming 21st Century Thinkers and Learners:
  • Texting! It's like a new language and communication.
  • Social Media! It's a new form a written text making critical stances plus using speaking and listening skills.
  • Audience! It's larger than just those seats in the classroom!
  • Online portfolios!
  • Online project presentations!
  • Interactive books!
  • Ebooks!
  • Voice Recognition software!
  • Extended Classroom Communities!
  • Differentiation!
  • World-Wide Web!
  • It's completely extended beyond the classroom walls!
  • Larger collaboration!
and more! Don't be afraid to dive in! Technology is a tool that improves our instruction and students learning!

Teaching Then & Now with The Learning Chambers


Hi friends!  I love being reflective about my teaching.  I have been teaching for eleven years and each year is a new journey for me.  I have learned to work smarter not harder and so many things have changed about my teaching.  Today I wanted to share my passion with you guys and hopefully inspire you to incorporate it into your classroom.

My passion is definitely 21st-century learning and providing our students with the inspiration and opportunities to explore and create through learning.  I have had so many magic moments in my classroom this year and I can't wait to share them with you guys.

Today I wanted to share how you can help your students create digital animated stories using Scratch.


So your first question is probably ... WHAT IS SCRATCH?  Scratch is a block style coding program that will allow your students to create their own interactive stories and games.  There is a free online version of Scratch and also a free version that you can download onto your computer.  You can find both versions HERE.


I honestly did not know much about Scratch until a few years ago.  I just dove into it and learned all that I know from trying different things and watching a ton of tutorial videos.  But trust me friends ... your kids will pick it up quickly and they will be motivated and inspired to create new stories.

Still unsure ... don't worry ... I've got you covered!  I created a short video tutorial that you can show your students.  The video will teach them how to create a short animated story in Scratch.  They can watch it and re-watch it until they feel comfortable or you can watch it and then teach them.  I have more tutorial videos coming soon.


Did you use Scratch in your classroom?  Let me know about it by leaving a comment below!  Happy Scratching friends!

Teaching Then & Now w/Tickled Pink in Primary

THEN: When I first started teaching, we did a lot of worksheets that came with our reading and math programs. They were VERY boring! Students weren't near as engaged as when I let them do actual hands-on centers, but unfortunately these worksheets or boring whole group lessons were a major part of our day. 
NOW: Thankfully things have changed, so we now do alot more small group work and students get more center time. We have now learned that it's important to have more engaging activities for students and let students learn from each other by working in groups. I created my Physical Phonics Word Work activities to give students a chance to work on phonics skills in a fun active way. This student is stomping out the number of sounds he hears in a word.
One of my favorite activities that I've made are my Fluency & Fitness sets. These are a fun way to work on literacy and math skills, yet students are able to get out of their seats while learning. It's also a way to incorporate technology which we know if very important now. Teachers love using these for learning time, transitions, brain breaks, and even indoor recess. 
Here's a sneak peek of Fluency & Fitness.
THEN: Speaking of using technology, look at how my old listening center used to be. Those headphones were HUGE and uncomfortable. I'm glad technology has come a long way so students can use iPods and iPads to listen to books now. 
NOW: Most schools are incorporating technology now and providing laptops or iPads for students to help them learn better.
THEN: As I was going through old files for this post, I found this old Kindergarten assessment. These were the skills we used to test students on for the year. That was back when we let kids be kids more and not put SO much pressure on them! 
NOW: Now Kindergarten students don't just have to be reading, but reading at a level D by the end of the year at our school.  I know many students are able to meet these high expectations we set for them, but I do wish we incorporated play more and were able to do more developmentally appropriate activities. 

SaveSave

Cramming It All In {The Learning Chambers}


I'm very familiar with a very tight schedule.  I previously taught in a Dual Language school and our schedule and routines were planned out to every minute.  I had to make sure that the kids and I were cleaned up and ready when it was time to switch to the next class.  Super tight but totally do-able!  I now teach in a school that services the Gifted and Talented students in my district.  Our days are super busy and it's so important for me to stay on top of our schedule.

One thing that has become my best friend in a very tight schedule is to have a countdown timer up and running during activities.  I have an activboard and I use their timer ALL THE TIME.  It's a great visual for the kids and it helps me avoid the "how many more minutes till we clean up?" or "how many minutes do we have left?" questions.


After I introduce the activity and give the directions, I immediately tell the kids how long we have and I set the timer in front of them.  I even add a fun sound so that when our time is up, they know.  Today I used an elephant and they got a big kick out of it.

Don't have an activboard?  No worries ... did you know that Google has a timer?


Just search for the amount of time that you need to count down and the timer starts automatically.  WAIT...WHAT?!?!  I know!  Such a huge time saver and the best part is that the timer is super loud when it goes off!  Great to get your class' attention.  I used this today while we were in the computer lab and my students started cleaning up when there was less than a minute left.  I didn't even have to ask them.  It was perfect!  

I hope that my quick tip helps you cram in all that you do in your busy schedule.  You guys rock!  

How do you stay on schedule?  I would love to hear about it in the comments.


Going Green: Using Google Forms to Assess your Students! {with The Friendly Teacher}


Hello EE Friends! It is Hannah from The Friendly Teacher here! We are bringing you all kinds of ways to go green in your classroom this month!

My FAVORITE way that I go green is using Google Forms. I don't like copying, actually I despise it. I mean, waiting in the line, sitting there staring just waiting for your copies to be done while your eyes burn out and your head tells you all the other things you could be doing. It is TERRIBLE! 

So, I rarely use paper assessments. Google Forms does all my assessment work for me! Google forms is a google tool that allows you to quickly make an assessment, send it to your students, and look at their responses one by one! There is no paper, the kids enjoy it more, and it is quick and easy. The students don't even have to have google accounts to do the forms!! They just need a computer and your link!

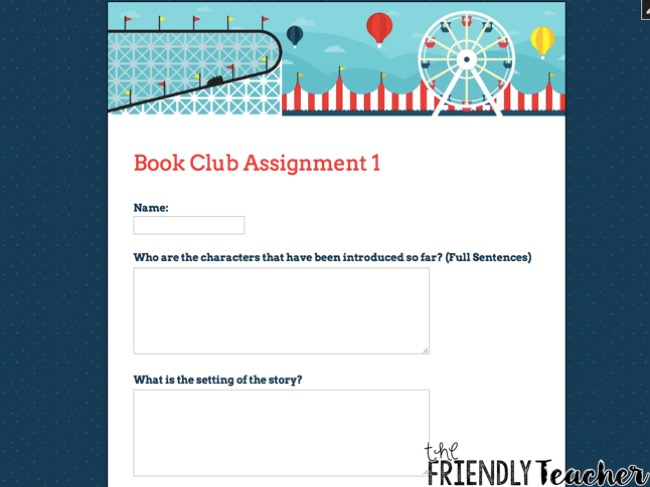
Here are some examples of what your kiddos will see once you put the form together. They fill it out and it is quick and painless! Plus, there are so many designs you can also make it CUTE! Yes, I just said it that it is painless and cute!!!! 


I am going to run your through very quickly how you set up a form! Then, you are going to go out right now and make a million assessments and never go to the copier again, sound good? :) 


First, you go to google forms! Then, you get to choose your style. There are exit slips, worksheets, assessments, etc.! There are tons of options or you can just create a blank one and put your creative powers to the test! 

When you choose your style you add a title and start adding questions! There are so many question choices.  You can make them type or just do all multiple choice, it's your call!

On the side there are lots of options. The plus sign is what you click to add a new question. You can download picture or videos to add to your question. Sometimes, I have my kiddos watch a video and then respond to what they thought of it!! You can do your own pictures and videos or add them right off of google! That last button on the sides lets you add different sections if you want to! The possibilities are endless!

Up at the top you can change the theme! They have tons and tons of fun and cute themes or you can add pictures that you have on your computer! It takes 2.2 seconds and it is adorable. (unless you are like me and will spend an hour scrolling through the screen to find the perfect one that your kids won't care about anyways)! Click the eyeball to preview the document and the send button to send it!

You can share it with your students if they have google accounts or when you hit send it will give you a link that you just give to your students! They even let you shorten the link. EASY! The students click the link, take the quiz, and hit send!


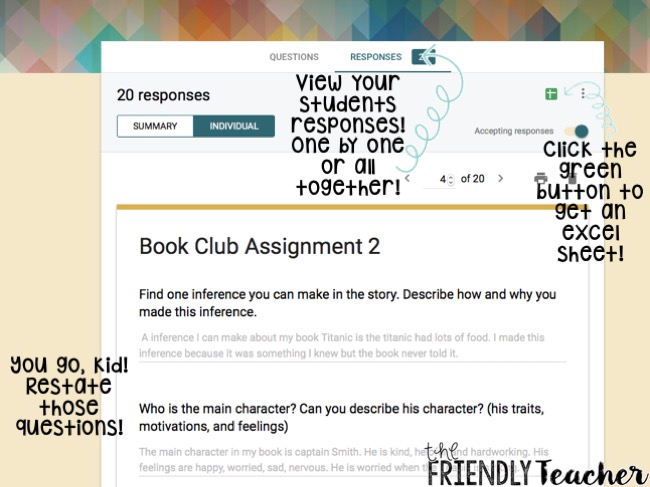
After your students have taken the quiz you will receive their responses. You can look at their responses individually or as a summary! If you want, you can download it into an excel sheet for easy grading! I find it easiest to just look at kids one by one and add their grade to the grade book! SO SIMPLE! The only downfall is giving them feedback! I typically will call them up while I am grading if we need to discuss or send them a chat box on google!

Umm can you see my kids restating of questions?!?!? Yes, child you get an A+ and you will be my favorite forever! ;)

I know, that this was a ton of information but let me tell you it is oh so worth it! It is the quickest, easiest, greenest way to assess!! Look at my kiddos LOVING their google forms!

They can even create their own google form quiz!

The possibilities are endless! You can give exit tickets, worksheets, videos, pictures, and the list goes on and on! Turn anything into this paperless and GREEN google form!

If you need help setting this up, email me at thefriendlyteach@gmail.com and I would be happy to help you out! I am signing off!


Assessment Tips & Tricks {with The Sunny Side of Second Grade}


Hey y'all! Welcome back for our last post on Assessment Tips & Tricks. Today I have for you a very cool website I have been using to help with assessments. My students are still getting used to it, but I have high hopes! :)

As you probably know, I work at a Magnet School for Technology and Innovation. We are always looking for ways to incorporate more technology, but do so sensibly. As a PLC, common assessments are essential to determine standards mastery. Our team found a lovely pack on TPT that has been helping us bring common assessments to life in our classrooms and across the campus. With the website I am about to introduce to you, you can literally upload any picture and make it fillable. Say whaaaat?! Oh wait...there is more!!

Not only can you do that, but if you wanted to, you could type up your own assessment. The possibilities really are endless. I am talking written comprehension, reading response, math questions, word problems, you name it, you can make it. And what's the best part? All the answers come through to your screen LIVE! That's right!! If you have your computer screen up, you can see students' answers as they input them. You wanna talk about reteaching glory?! Can you hear the angels singing already?

Okay...now let's unveil this baby! May I introduce you to GoFormative

Have I convinced you to sign up yet? Look how colorful!!


Thank you Jen Jones for this amazing product. Character change is really a beast for my little sweeties, but that is a whole other post.
I hope this saves you time and paper money as much as it has me. I know my students are totally loving using this website. They have become very self reflective when seeing their scores immediately. In addition, I am able to sit down and conference with them immediately, if time allows, in order to reinforce some skills they may be having difficulties grasping.


Technology Tips & Tricks: Do you Symbaloo?


Hello friends! It's Kim here from For a Love of Teaching to introduce you to one of my favorite technology organizing tools!

Have you heard of Symbaloo?


Do you have websites bookmarked here, there, and everywhere?

Do you have amazing websites you've found over time to use in your classroom or with your students, but can never find them when you need them?

If so, then Symbaloo is perfect for you!


Symbaloo is a FREE visual bookmarking tool that makes it simple and fun to organize the best of the web. With an account you can access your bookmarks from any device and share your online resources with others.

How can you use this in the classroom you might ask? Until recently I didn't really see how this would be a "classroom tool", but trust me it is! You literally have all your favorite websites at your fingertips, and even better than that - you can organize your resources, share, and access them from any device.

You can create a webmix of links, share it one time, and your students will get automatic updates when you make changes. Symbaloo will generate a link for you to share either privately or publicly that will take students and parents straight to your webmix. Symbaloo will also generate you a embedded code to add to your class blog or school website.

Teachers are also using Symbaloo to create lesson plans by creating a webmix for each subject they teach. Teachers can create website links, image links, or video links that they plan to use while teaching a particular lesson.

Here's my "personalized" classroom Symbaloo Webmix that I share with my students and parents. Parents no longer email me or call to ask, "Do you have a good website for math practice?" Or, "Is there a reading website I could use with my child at home?" They don't have to ask, because it's all in my webmix, and they can usually find what they're looking for!
Check out this great article I found: 11 Ways to Use Symbaloo in the Classroom

Symbaloo isn't just for school or work either. You can use it to create your own personal homepage full of websites you visit regularly! You can organize a variety of different webmixes such as your favorite online stores to shop, recipes you'd like to try, news and weather websites, or favorite blogs you like to follow. 

Check out Symbaloo's website for more ideas. The possibilities are endless!

How do you Symbaloo?

Technology Tips: Using Email to Save Time and Paper

Do you have a love hate relationship with technology in your classroom? I know I have always loved learning new tricks of the trade, but sometimes hated trying to figure out new ways to incorporate technology in meaningful and time saving ways.

One of my favorite technology tips that saved me a lot of time and copying was teaching my students to use email.  Now I was lucky enough to teach in a school that had a 1:1 iPad initiative so each one of my kiddos had their very own iPad assigned to them, making this easier for me to implement. however you could tweak it just a little bit to use the same ideas with just one or a few class iPads.
So how on earth did I get my kinders to learn how to email me, quickly, without 873 questions at the beginning of the year when they were still learning to write their own name let alone use email? It actually was quite simple and within a week they were pros! Here is what I did.
First, I started with a little help from our building tech coordinator.  She pulled each one of my students and set up their individual email accounts on their iPads with them.  This was a lifesaver for me so I didn't have to lug all 20 iPads home to enter their info. If you've ever tried to carry 20 iPads at the same time, you know how ridiculously heavy they are, not to mention the fear that something horrible will happen to them in route.
Next, I gathered all my sweetie pies on the carpet in a large circle with their iPads in hand.  We went through each one of these steps together.
  1. Open the camera app.
  2. Take a picture.
  3. Tap the share icon.
  4. Click on email.
  5. Type in my teacher email address. {This part was probably the craziest and most time consuming considering many were still learning letters, but I had the address written on the board and helped a lot.  The best part was that after entering my email once, it automatically pops up after they just type in the first letter!}
After practicing this whole routine a few times together, everyone was able to do it independently! I'm always amazed how quickly their little brains absorb technology! 

Okay, now you're probably wondering how teaching my students to email pictures to me really helped me accomplish anything.  As cute as their little selfies are, I had bigger plans in mind.  Plans that included more accountability and less paper.  

I use Words Their Way in my classroom and my students complete their sort every morning when they come in.  Walking around to check all of their sorts every day, while trying to do lunch count, attendance, and take care of all the morning craziness was just getting to be a mess. So once they learned how to email I just had students take a quick picture of their completed sort. This email option not only saves me time, but I can also keep a record of their work and easily identify any confusions.  This record is also great to share with parents.
Another way to use email with little ones to save on paper is in centers.   Sometimes I don't necessarily need a response sheet for a center, but for accountability reasons, I feel like I'm always creating or searching for one.  With email, students can take a picture of their work (a number sort, ordering numbers, a shape hunt, words they have made with magnets, play dough, etc.)  This definitely doesn't replace those centers that I need students to practice writing something, but does help a lot!

When students get a bit better at writing, they can start to type and email them to me.  Again not a complete substitute for handwritten work, but another fun option for sure!
We also use the scribble press app to write and create stories.  This app has a share by email option as well so this will be great for feedback as students are working.
Another fantastic idea I got from a 4/5 teacher in my building was to use it for general questions and needs throughout the day, especially when I am with a group.  Instead of students leaving their spot and interrupting my small group time during daily 5/math/writing, they can simply email a question or need that they have to the teacher.  I always have my iPad next to me so I would receive the email notification immediately and be able to respond quickly without much disruption to my small group or the rest of the class. Now of course this will be a bit more complicated for kindergartners that can't always write what they are trying to say....so my thoughts are to have students use the dragon dictation app to quickly say their question and then email it.  When they receive my response they  just highlight the text and click on the speak icon (needs to be turned on in the accessibility options first) to have it read aloud to them.  PROBLEM SOLVED!!
I'd love to hear any great ideas you have for using email in the classroom with your kiddos. Leave a comment to share your ideas!