Facebook Pinterest Instagram Bloglovin' Teachers Pay Teachers Image Map
Showing posts with label freebie. Show all posts

The Magic of World Study {with Stephany from Primary Possibilities}


These are some of my favorite ways to practice words in the classroom.  They would work with anything from sight words to vocabulary words!


I make these flip folders for my students at the beginning of the year.  You glue a sheet with lines (the line size and number depends on how many words you assign your students to learn each week) in a file folder.  Laminate the entire file folder and then cut two slits to make 3 flaps.  Students write the words under the first flap and then practice under each flap without looking.  

Another great way to practice words is hands on.  Kiddos love play-doh and my friend Stephanie over at Primary Possibilities has these great sight word mats.  You can pick them up HERE.


If you are looking for a fun way to get students to practice throughout the week at home, you can grab up these STAR spelling freebie.  Students choose from several options throughout the week to practice their words.    You can grab it up for FREE HERE.


Wiki Sticks are always an easy standby for word work.  Keep them in a container with a list of words and your students will always have something easy to grab up when they are finished early with another activity.


I love keeping these Word Wall cards on hand in my classroom.  There are tons of fun ways to practice sight words with different motions and voices.  You can grab them up by clicking HERE

What are your favorite ways to practice words in the classroom?


The Magic of Word Study & a FREEBIE {Tickled Pink in Primary}

At the beginning of the year, when we are working on letter sounds, we use these building word cards. Students fill in missing beginning, middle, or ending sounds and record the answer on the worksheet. You can find this activity here
Another way to work on filling in missing sounds is at our stamping center. Students LOVE using stamps! I use this center all year and just simply switch out the worksheets for the alphabet, letter sounds, CVC words, etc. You can grab a few of these stamping worksheets FREE in my TPT store here
I made these sound spinners so students can easily see that by substituting just 1 sound, they can make new words! I created spinner for beginning, middle, and ending sounds.  Students simply spin the wheel to show a new sound, read the word, then lift the flap to see if the picture matches the word they read. Then students will spin a new sound to make a new word! Each set of sound spinners comes with a worksheet for students to provide their answers. You can grab these sound spinners in my TPT store here
These CVC word cards are an easy way to help students practice building simple words. You can use magnetic letters, playdoh, dry-erase markers, etc. for added fun! You can find them in my TPT store here.
 During my small group, we use these mini cups to work on word families. I gave students a cup with a red word family on it. They then had a stack of blue letters, and put one letter in front of the word family to make a new word. Next, they could stack another blue letter on top of the other cup to make a new word. The word family cup (red) doesn't move until they've built 5 words. They can then get a new word family and start making new words. Eventually, I'll add harder word families and blend/digraphs instead of just 1 letter on the cups. 
Another way to work on word families is with these word families mats I got years ago from Lakeshore. I love that they are dry-erase and give the students a picture clue for the word family. My students really enjoy using these mats, and they seem to catch on to the idea of word families quickly. My students love to show me when they use a blend or digraph to make a bigger word. Word families are an easy way to help build student confidence in reading!
One of my students FAVORITE activities is Fluency & Fitness! I have created over 50 different sets so we can work on these for any and every skills possible. I love doing these because students can work on academics, get in some exercise for a brain break, and I don't lose any instructional time. You can find all of my Fluency & Fitness bundles here

SaveSave

Tricks & Treats from The Learning Chambers


Halloween is just around the corner and that means it's time again for EE's Tricks and Treats.  The Elementary Entourage bloggers will be sharing some of their favorite teaching tricks and tips.  We will also have some terrific teaching treats just for our readers!  Make sure you stop by each day for some trick or treating fun!

I am very excited to share some teaching tricks to help you implement an ozobot challenge into your classroom.  I love STEM challenges that involve programming and the ozobots have definitely been a class favorite lately.  Here are some tips and tricks to help you implement a challenge that uses both quadrants and coordinates.


My first trick is to make sure that you give your students time to explore.  It will really help with classroom management and will also give your students time to work through challenges and learn how to use the ozobots independently.


My second trick is to align your ozobot challenge to something that your students are currently learning about.  My students were learning about x and y coordinates and the four quadrants, so our ozobot challenge centered around that.


After our lesson, I gave the students a piece of grid paper and a checklist.  The students had to find the point of origin and then label the x and y coordinates.  As part of the challenge, they had to determine the starting part or where their ozobot would start.  Then we used ozoblockly to program our ozobot to complete "tricks" inside of the grid.  The challenge was to make sure that our ozobot stayed inside the grid.  It was a challenge but a fun one!

Do you want to have your students complete this ozobot challenge using quadrants and coordinates?  I have this freebie as a treat just for you!  I included several different grid paper sizes for easy differentiation and also an easy to follow checklist.  I hope this helps you implement the coordinates challenge into your classroom.


Click HERE to grab your treat!

Tricks & Treats from Mrs. Plemons' Kindergarten

Fall is in full swing here in Wisconsin and Halloween is just around the corner, which means costumes, pumpkins and trick or treat. But trick or treat isn't just for the kids, here at The Elementary Entourage our bloggers will be sharing some awesome teaching tricks along with fabulous teaching treats just for our readers! So be sure to stop by each day for trick or treat teaching style ;)
Do you struggle to keep your students engaged throughout the day? I think we all do at some point! The days can be long especially for our littlest learners, and I don't know about you but I can't sit at a desk for long periods of time either. So I bring you a little teaching trick to boost student engagement!
Getting those kiddos moving is a sure fire way to increase student engagement. And did you know the part of the brain that processes movement also processes learning, so incorporating movement with learning as much as possible is really a brain based teaching strategy. (Remember to pull that little bit of info out that next time your admin comes in and the kids look like they are running wild...)

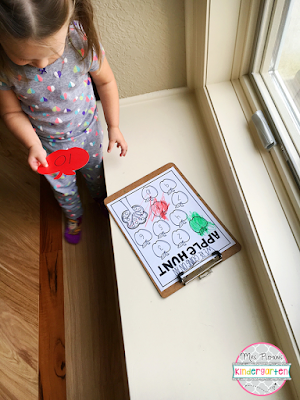
One of my FAVORITE games to get students up and moving this time of year is letter/number hunts.  These games are super easy to set up and help students practice fluency with identifying letters/numbers. There are lots of ways to differentiate these games as well.
I started playing these games with Madelynn at home so here is how we play at her level:

1. Set up the game by writing letters or numbers on large shape cut outs, or use printed letter/number cards. Hide the cards all over the room.
2. Clip a page with all of the letters/numbers that she needs to find on a clipboard.
3. Madelynn searches the room to find each letter/number on her page. She has to match it, name it, and color it before moving on to another card.

In the classroom you could do so many variations with this game. You could have students match the letters or numbers like we did, or you could match upper/lower case letters, count sets and find the number, practice letter/number writing on the response sheet, and so much more! When playing with a whole class or even just small groups you'd just need to remind students to leave the cards where they found them instead of collecting them along the way like Madelynn and I did.

If you want to try this activity out, I have a little treat for you!
You can grab my Apple and Leaf Hunt activities for FREE here:


Looking for more activities like these? I'm finishing up a full set of fall themed letter and number hunts that will be posted soon. Be sure to follow my store here so you will be notified as soon as they are ready!

Thanks and happy trick or treating :)

Packin' Up Tips with Amna from Teach Two Reach


The end of the year is a trying time for us teachers. Kids are going bananas and let's face it, so are we. I'm here to share with you some end of the year ideas that will help you wrap up the year and keep the kids busy as well. 

First up:
TREASURE BOX AUCTION

If you do a money management system, or even if you don't and give students some sort of currency (tickets..etc.), this will be amazingly fun for the kids.

I love this system because it helps me clear out items I don't want to carry on with me for next year.

I like to try to put much of my left over treasure box items up for auction. Basically, students have saved money that they haven't used for other things...some have more, some have less. I lay out all the items that are going to be bid on. We go over the rules of a silent auction and students can either raise their hands or hold up an object such as a Popsicle stick when they want to bid on something.

I'll describe all the items before I begin so students can be aware of what there is and if they would like to wait out for something. Then I start with random items and depending on the quality of the item, I start the bid. For small items, it will be something like 25 cents and then go up, and prices vary for others. I usually have multiples of smaller items so I say like, "5 kids can this item." 

Then it is bidding time. I keep on increasing the price until the last kid (or kids if there is more than one of the item), standing gets it. Then we move on to other items. Some kids love to get a bunch of little things. Some kids hold on to their money for the bigger items. But I always tell them they are taking a risk holding out as well because they might not get it. Sometimes what they want gets bid on by a higher bidder, and so it doesn't go to them, so then they just bid on other things. Basically, I make sure that everyone gets something. 

Next:
End of Year Student Compliments

love using my own kids as test subjects :)


Here is a way to keep the students busy for a while so you can sneak in some packing up or cleaning out in the classroom. One of my biggest tips is to try to get little things done while students are busy. You can go through paperwork that needs to be recycled, or slowly start taking things down from the walls, or cleaning out drawers, etc. This next activity will help give you some time to do just that. 


I learned this when I was student teaching 8 years ago. I put a picture of each student in the middle of a piece of paper that has spaces to write going all around the picture. The number of spaces depends on how many students there are. 
Then, we arrange our desks so that it is easy to pass the paper to the student next to them and that the rotation can be nice and circular without students getting confused as to who gets the paper next. I give each student a person to start with (not themselves), and they write one kind or nice thing about the person in the picture. They write their name after their sentence. Different color pens look good. Then we all rotate the papers at the same time. By the end, students will have written a compliment for each other student in the class and I will make sure I leave a space for my compliment as well. 
This serves as a beautiful keepsake that students can treasure forever. 

I am attaching a link to the PDF file that has the template - it will have the place in the middle for the picture and the title. You will need to add in the bubbles to write in according to the number of students in your class. Enjoy!


I hope this year has a smooth ending for you all! Before we know it, it will be time for back to school tips. ;)

Don't forget to enter our giveaway which is ending tomorrow!


a Rafflecopter giveaway

Packin' Up! Prepping your Student Information Binder with The Friendly Teacher + FREEBIES & A GIVEAWAY


I have one more week, my friends. I am nearing the finish line and I can smell the late nights, sleeping in, frequent bathroom breaks, and lots of uninterrupted Netflix time!

But, before I head out for the summer there are a few things I like to prep for the next year. I like to do the simple things that stay the same year to year. One of my favorite things to do at the end of the year is get all my organization binders ready for the next year. I put my lesson planner together, my daily five binder, my math stations binder, and most importantly my student information binder.

I am here today to share with you my 100% free student information binder. Do you ever have an IEP meeting and you are scrambling for data??!? Or that one parent who calls you out on every single thing and you just can't remember exactly what you said?! That is where this binder comes in handy! I put all of the data for my students in one binder. Their parent communication, intervention data, checklists, and so on! I just put mine together for the next school year and would love to share with you all of its loveliness (soon it will lose all its beauty when I put my not so teacher like handwriting all over it)

First, I have to put a cute cover on it because DUH! :) Grab this cover in a bunch of different colors here for FREE! :)


Then, I separate my binder into sections for each student. I choose to use construction paper to separate the sections. I choose this because then I can write little notes about the students on the dividers or things I need to remember! It makes for a perfect way to kill two birds with one stone! ;)


My first sheet is their reading and writing checklist. I conference with my kids in both reading and writing once a quarter. I keep all the notes from this conference on this little sheet! It is all in the same binder so it is simple when it comes to these conferences!
Grab this sheet for FREE here!


Then, I like to keep their intervention data sheets. I keep one for each kid so I can mark down anytime I work with them one on one. Yes, you may not need to mark everyone down, but if you ever run into a situation where you do need this data you are always prepared! So, I call a kid up work with them on a skill and jot it in their binder. LIFE SAVER when it comes to IAT meetings! I got these sheets from the AMAZING JD's Rockin' Readers for free!! Pick them up here!


The last thing I shove in this binder is a parent communication form. I use this form to track any incidents where I talk to the parents or the principal. This keeps me organized and I never run into a situation where I can't remember what I said or did! WOHOO! Grab this sheet here for FREE! Or click the picture and it will take you right to it!
As the year goes on, I may print emails and put them in the binder, put test scores, or important papers! I like to add a sheet protector for each kid to shove these things in, so I don't have to hole punch anymore! :) I just love that I have all the documentation in one place for each student! By preparing these before I leave for summer I am 100% more likely to use it!!! Prepare now so next year you are an organized teacher superhero! Happy summer, friends!


a Rafflecopter giveaway